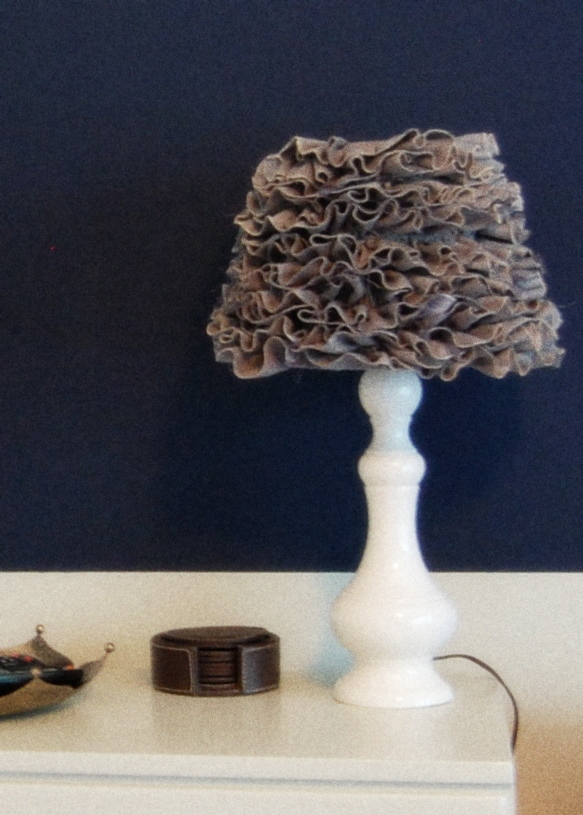
Time to start sharing the details of the family room I showed you a few weeks (months?) ago. Let's start with the fabric ruffled lampshade that I saw first on Crafty Texas Girl (via Centsational Girl), this is hers:
I had some major lampshade issues in this room. I was planning on using a little yellow lamp from Goodwill, but no shade seemed to look right.
Yikes. It's like a bad day in the dressing room.
I ended up choosing the top left shade for the ruffle project because I thought that once I added the ruffle, it would be the right proportions to the lamp.
I started by tracing my lampshade to create a template, then used the template to cut my fabric to cover the white shade. I really really like the fabric, and wanted to use it even though I figured it wouldn't let much (or any) light through it.
Once I got to the bottom, I didn't like the way you could see the seam of the ruffle, so I glued it to itself to make a cleaner look...
I ended up doing that to the top and bottom to keep the ruffles together. I put it on my lamp, and still didn't like the way it looked. I decided it must be the lamp base, so I used a different lamp I had and liked it 100% better. I don't have a great "after" picture (just like I didn't have "after" pictures of the whole room), but you can get the idea from these pictures...
Ruffle Shmuffle, fun project! And since the edges of the ruffles are unfinished, I occasionally have to give it haircuts to remove the extra threads, but hey, who doesn't need a little haircut every now and then? Give this one a try!--- it adds a nice feminine touch to a room without being girly. I wonder how it would look to use all sorts of different fabric ruffles, varying colors and patterns? Could be very cool! Again, you can get the full directions here.
Hope you're enjoying this Indian Summer as much as I have been. Have a great night!
home⋅stead –noun /ˈhoʊmstɛd, -stɪd/ [hohm-sted, -stid] any dwelling with its land and buildings where a family makes its home.
Showing posts with label Sewing. Show all posts
10.09.2011
8.17.2011
Newborn Sleeper from Tshirt
Thanks to This Mama Makes Stuff, who shared a great tutorial and pattern here on making a newborn sleeper from a large t-shirt! I used up one naptime to make one for our friends who just had their first baby boy, and who also happen to be IWU grads. I was pretty happy with it, and if you are an IWU grad and you have a baby, you'll probably get one in the mail too.
| Yes, I know this picture is sideways, but I don't feel like taking the time to change it. You get the general idea. |
| "Never Too Young" |
6.22.2011
Key Fob
Saw these wrist key chains a few weeks ago on Infarrantly Creative, originally from the Idea Room. Her fabric choice and perfect sewing construction created instant desire to make one for myself. Enter: my so-so fabric choice and far-from-perfect sewing "science" (I guess that's what I'll call it) = a different version that actually turned out quite handy.
I didn't feel like waiting to buy a clip, so I repurposed my current (annoying) key strap. Go Kats!
In hindsight, I should have left more length on the right side of the strap... I didn't leave myself much sewing room. I also chose some really thick fabric, so I didn't add lining. Since my fabric was so thick, I could hardly sew through all of it to attach it to the clip! So I decided to use embroidery thread to secure the attachment. I actually really like it...
Do I just like it because I'm the one who spent all the time sewing it? Who knows. Either way, it is MUCH more functional than that freakishly long IWU string that always tickled my leg while driving. It's also the perfect size to throw around my wrist, or just let it hang out of my purse pocket (easy to grab before getting into the car...ehh, van).
So I highly recommend them. To everyone. And if you don't want to make one, hire me to do it so I can get more practice. Thinner fabric would offer the look of the original one that I linked above.
Well there you have it. Happy Wednesday!
I didn't feel like waiting to buy a clip, so I repurposed my current (annoying) key strap. Go Kats!
In hindsight, I should have left more length on the right side of the strap... I didn't leave myself much sewing room. I also chose some really thick fabric, so I didn't add lining. Since my fabric was so thick, I could hardly sew through all of it to attach it to the clip! So I decided to use embroidery thread to secure the attachment. I actually really like it...
Do I just like it because I'm the one who spent all the time sewing it? Who knows. Either way, it is MUCH more functional than that freakishly long IWU string that always tickled my leg while driving. It's also the perfect size to throw around my wrist, or just let it hang out of my purse pocket (easy to grab before getting into the car...ehh, van).
So I highly recommend them. To everyone. And if you don't want to make one, hire me to do it so I can get more practice. Thinner fabric would offer the look of the original one that I linked above.
Well there you have it. Happy Wednesday!
5.30.2011
Pants to Shorts
It seems like this must be the oldest trick in the book, but regardless, it was something I thought of that was an "aha" moment to me. Once it got hot out, I realized I only had 1 or 2 shorts total for the twins. That just wasn't going to work. I was planning on going thrifting or to consignment shops, but then I was like Wait! I just put a few pairs of pants into storage bins that are too short for them. Perfect!
So from there, I proceeded to chop off the pants and either leave as is, or add the original hem back on, depending on the fabric. It was also nice to choose the length of the shorts (as some are already designed to be so short, for a ONE year old!).
If you think you'd like to do this, but don't have much sewing experience, I still think you could. As seen below, I cut off the pants, added the original hem back on (pin with raw edges at bottom and right sides together), sew, and you're done. The only caution: if you haven't sewn knits before (like t-shirt material), don't stretch it as you sew! (it makes it stretch and ruffle) I made this mistake on one of the legs and had to redo it.
So from there, I proceeded to chop off the pants and either leave as is, or add the original hem back on, depending on the fabric. It was also nice to choose the length of the shorts (as some are already designed to be so short, for a ONE year old!).
If you think you'd like to do this, but don't have much sewing experience, I still think you could. As seen below, I cut off the pants, added the original hem back on (pin with raw edges at bottom and right sides together), sew, and you're done. The only caution: if you haven't sewn knits before (like t-shirt material), don't stretch it as you sew! (it makes it stretch and ruffle) I made this mistake on one of the legs and had to redo it.
I only did 3 pairs for now, and the purple one I didn't even hem (especially take note of that if you don't want to sew!).
If you're thinking "I don't know about that"... you could always designate them as play shorts, ready for the wear and tear and tear that summer brings to little bottoms! This would also be good for girl or boy. The same day I made these, I saw this post from Dana at MADE (one of my top 5 blogs for sure!).
The way I see it: 3 free pairs of shorts!
5.04.2011
Kid's Hoodie Fix Up
One of Christian's most-used zip up hoodies mysteriously got a stain across the front. I was bummed, but just ignored it and he wore it anyway (don't know if you can see the stain in this picture, but that's what it looked like before).
Then I came across this blog post about making a boy's shirt into a hoodie. The idea I liked was sewing the graphic part of an old tshirt across the front. And I was like: YES! THAT'S WHAT I'LL DO!
So I found some tshirts in boy-appropriate colors with cool graphics, cut the part out that I liked, and sewed them on right over the stain. First I zipped up the hoodie, pinned the scraps in place, cut up the middle where the zipper opens, then sewed in place (and no need to worry about hemming the edges, they won't fray or unravel, as long as you use a tshirt). Ta Da!
But the colors on the front seemed a little out of place, so I also added more of the blue inside his hood. I copied the hood shape, sewed a seam in the middle, then sewed it in place. The bottom edge (by the neck), was left raw, but again, that is okay with tshirt fabric.
Yes, I like that added touch. And he loved the "updated jacket"...he thought he was soooo cool.
I was also planning on adding some embroidery stitching around the sleeve cuffs (also suggested from this post and also here), but I never got to it, and now summer is practically here. Guess I'll save it for another project.
So if your kiddo gets a stain right on the front of a shirt or jacket: THERE IS HOPE! If you can pin, cut, and sew a straight line, you can re-make a favorite shirt into an even "more-favoriter" shirt. YESSS!
Then I came across this blog post about making a boy's shirt into a hoodie. The idea I liked was sewing the graphic part of an old tshirt across the front. And I was like: YES! THAT'S WHAT I'LL DO!
So I found some tshirts in boy-appropriate colors with cool graphics, cut the part out that I liked, and sewed them on right over the stain. First I zipped up the hoodie, pinned the scraps in place, cut up the middle where the zipper opens, then sewed in place (and no need to worry about hemming the edges, they won't fray or unravel, as long as you use a tshirt). Ta Da!
But the colors on the front seemed a little out of place, so I also added more of the blue inside his hood. I copied the hood shape, sewed a seam in the middle, then sewed it in place. The bottom edge (by the neck), was left raw, but again, that is okay with tshirt fabric.
Yes, I like that added touch. And he loved the "updated jacket"...he thought he was soooo cool.
I was also planning on adding some embroidery stitching around the sleeve cuffs (also suggested from this post and also here), but I never got to it, and now summer is practically here. Guess I'll save it for another project.
So if your kiddo gets a stain right on the front of a shirt or jacket: THERE IS HOPE! If you can pin, cut, and sew a straight line, you can re-make a favorite shirt into an even "more-favoriter" shirt. YESSS!
3.21.2011
Crayon Wrap
I made a little project the other day for my niece's birthday. I had wanted to make a crayon wrap (carrying case) for a long time, but never had a good enough reason. But I thought it was a cute gift for a 5 year old girl (who will probably actually care enough to keep her crayons nicely organized, obviously not something Christian is ready for yet!). It turned out to be pretty simple.
You could make a double layered one for up to 64 crayons like the one here.
Or an apron like this one. (cute to wear, but not very practical if you want to sit or lay down while you color).
I have seen these occasionally in the DIY blogging world, but I can't remember seeing a tutorial for one (although I'm sure there are probably dozens). Would anyone be interested in a tutorial?
1.14.2011
For My Sister
I had been planning on making a bag/purse for my sister for Christmas. She chose the fabric out over our family vacation this past summer and I was hoping she forgot about the idea. :) She also got a HP Mini a few days before Christmas, so I decided to make a quick computer case too. I mailed them and we skyped while she opened her package. According to her, she likes them (breathe out!).
The purse was made from a $1 pattern sale, yippee. The whole thing went smoothly until the last step around the top: for some reason it all bunched up and looks puckery. Thankfully, it puckered the entire way around so it looks like it was supposed to be that way. Ah well, task completed.
And I want you all to know, if there is anything at all that you would like made, I would be more than happy to make something for you too. I can do work at competitive prices and am willing to try just about anything, I can ship anywhere. Keep me in mind!
The purse was made from a $1 pattern sale, yippee. The whole thing went smoothly until the last step around the top: for some reason it all bunched up and looks puckery. Thankfully, it puckered the entire way around so it looks like it was supposed to be that way. Ah well, task completed.
And I want you all to know, if there is anything at all that you would like made, I would be more than happy to make something for you too. I can do work at competitive prices and am willing to try just about anything, I can ship anywhere. Keep me in mind!
9.07.2010
Puffer II: "Carpet Bag"
I had a few wonderful days of creative output, and I have to admit, it was worth every minute!
This messenger bag is for a friend here at IWU. She is an English major and chose this classic upholstery fabric; it's soft and thick and totally fits her. I knew what I wanted for a strap, but couldn't find anything that would work at the store, so I asked Simon if I could have the belt he was wearing. PERFECT!
She also chose some feaux leather for accent pieces. I used them here and for the bottom of the bag:
The interior is a bit more playful and bright than the outside. I like surprises.
I actually used the same pattern I have used before for diaper bags, so I was very familiar with it and made a lot of fun little changes along the way. The thick fabric didn't always get along with my sewing machine, but I'd rather not think about those times right now.
All in all, it was time well spent, and there's a handsome little bag to show for it!
9.03.2010
Blanket Beautiful
Each child in our home has been blessed by the gift of a quilted blanket and name wall-hanging made by my Mother-in-Law. They have definitely been getting use for "baby laying" on our living room floor, and they just look so pretty folded and piled in their bedroom.
I've also gotten a few of my own along the way (yippee!)
I little table runner...
This is probably my favorite!...
Isn't this detail amazing?
8.30.2010
Puffer Computer Case
I was asked to make a computer case and messenger bag for some friends, and how could I resist? I decided to tackle the computer case first (build up my self esteem since I haven't sewn much over the last 6 months). She chose fabulous fabric, and I was pretty happy with the way it turned out. I based the design on the Colcasac Sleeve. The girl I made this for is going to school to become an architect (architects, builders, and engineers rate pretty high up my list of cool people). Doesn't this fabric lend itself beautifully to the architect in training?
Christian is staying with my parents this week. My goal for today and tomorrow is to finish the messenger bag. I can't wait to see how it turns out!
11.24.2009
"Mama-Go" and Rachel Henry Design
10.11.2009
Last Week in Our Little Yellow House...
The final week has arrived. We will be moving next Saturday--- anyone who wants to help is welcomed. We are moving into a quite small, upstairs one-bedroom apartment. So this week will be busy packing, cleaning, and moving stuff to either our apartment or our storage unit (and trying to figure out what we WON'T need for the next 3 months).
I had the great chance to go to a craft show yesterday with Rachel Bowman... she makes and sells amazing jewelry, she does great at the shows! I took all the baby-stuff I've been sewing, and I heard a lot of really great comments and a lot of people really liked it. Unfortunately, it seemed that the economy and the lack of people who know pregnant women kept sales down. Way down. I actually didn't even sell one thing. *sniff sniff. But all of my stuff is now listed on my etsy store (etsy.com, search for rachelhenry under sellers). I also have a good stock of gifts for future baby showers. :)
This was my little table next to Rachel's jewelry table:
(Rachel's a pro at this!)
Christian really likes cottage cheese. :)
My men (Simon is obviously on phone!):
More again next Sunday...
Subscribe to:
Posts (Atom)