Showing posts with label Interior Design. Show all posts

1.28.2012

Revamped Dresser/End Table

Well hello there!
I've done hardly anything in the creative realm since moving (back) to Indiana.  So I guess I can just finish filling you in on the little dresser I refinished for our previous family room.

That simple little dresser wasn't always that way.  Here's what it looked like before:

I went to the handy site Centsational Girl, and gleaned from her many hours of refinishing.  (Go here to read her tips on painting wood furniture).

Got my tools ready:


Fun stuff.

Scraped till my heart was content.  Then sanded.  Primed.  Painted.  You know the routine.

That little spray paint hand-nozzle is SO worth the money.  Buy one.


I was too cheap to buy drawer pulls.  And I couldn't decide what I wanted.  Then I saw these wooden beads I had bought at Joanns for $1 (for 12!).  Even though they're a little small, I thought they were cute and liked the natural wood look.  I found screws that fit perfectly and secured them through the already-drilled holes.


And my project was complete!  
Almost.  I painted the sides of the drawers my favorite shade of green, like, "surprise!" when you open it.  I also lined the cruddy insides with some old wallpaper I've had sitting around for years.  


I love that it was added storage in a room that otherwise had none.  We kept our exercise videos and equipment in the top drawer, dvd's in the 2nd, and VHS tapes in the 3rd.  Who knows what it will evolve to be in our next home.  
Adios!

10.29.2011

Seasonal Decorating

I'm feeling rather blunt today, and wordy.


It seems that the more blogs I read (and there are an endless amount available, and increasing daily), the more perplexed I get about seasonal decorating.  Posts usually written by stay-at-home moms who talk about how busy and crazy their lives are, how they do such-and-such to get it all done, and oh yeah, here is a picture of my mantel...in every season, AND Valentine's Day, St. Patrick's Day, July 4th, Columbus Day (really?), Autumn, Halloween, Thanksgiving, Christmas, and New Years.  Are they really too busy?  I'm being a little extreme (just a little), and I do realize that these women are scouring them homes looking for ideas of what to write their next blog post about.


Side Note:
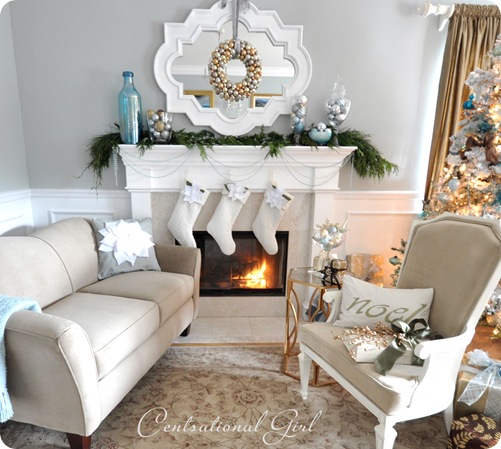
I'm also dying to know where all these crafty ladies store all the items they are constantly making.  Do they have 2nd homes where they put it all?  Take Centsational Girl, for example.  I am in awe of her decorating style, she has some mad skills!  But take a look at this (gorgeous) room:
Source
Isn't it amazing!?  But look closer, I think the only things that aren't Christmas decorations are the furniture, table, rug, mirror, and obviously the fireplace (she probably also reuses the glass vases on the mantel for other seasons).  All that other stuff: where's it go the other 11 months of the year?  Then multiply that times the other seasonal decor she switches out in this same spot.  I'm sure she has a system, like I said, she has mad skills.


End side note.


Before I go too far, I should define "seasonal decorating" in my terms.  Seasonal decorating would include changes to decor in and out of your home at nearly every opportunity.  This would include porch redo's, any blow-up yard ornaments, new paper garlands strewn around the home each month, etc.  This would not include bringing flowers from outside and putting them in a vase on your table during spring, setting pumpkins or gourds on your front porch in the fall, using pink napkins on Valentine's Day, etc.  Neither list is exhaustive by any means, but the blog world also does not need to see every little seasonal change either.  


Now, my only exception to seasonal decorating that I like and will do is Christmas, within limits.  Things can be tacky.  Very tacky...
Source
I'm a fan of simple and timeless Christmas decor.  Things from nature.  White lights.

Source
Source
Source
Moving on.

This has led me to the conclusion that I am generally not a fan of seasonal decorating.  Why?
1- It costs money.  You buy things to decorate your house, then you need to buy bins to store them in.  In our situation in life (and maybe yours), we are looking for ways to save every last penny and apply it to loans, retirement, kid's college, and vacation.  If you are in a similar stage of life, consider cutting back on your seasonal decorating.  
2- It takes up space...visually and when you store them.  If you remember a while back I shared the blog Becoming Minimalist with you.  From my own experience of moving several times and having to get rid of accumulated possessions, I'm a huge fan of clearing out the spaces in our lives, seen and unseen.  
3-  Your tastes change from one year to the next, and something you spent money on last year may not be your style this year.  You'll either throw it back in your storage closet (taking up more space), or donate it.
4- Does it really affect your overall happiness?  In trying to think of why people decorate at every season, the only 2 reasons I can come up with are that 1). it may make them happier when they see them, and 2). it allows them to have a creative outlet.  For all the crafters out there, it gives us things to make to get our "crafties" out, right?  I can understand the 2nd reason and I do think it is valid, although I don't know if it refers to the majority of people out there.
I truly believe your (and my) crafting abilities can be applied to items and areas in our lives that will serve more function.  I'm huge on function.  But that's another post.  


Now recently, my biggest peeve is Halloween.  Aaaghh.  I don't know who decided that putting cob webs, ghosts, spiders, freaky things, etc. etc. was tasteful.  I found one quirky article about decorating for Halloween.  I thought something they said was interesting and gave some insight into where these sort of decorations originated,
"It’s really hard to overdo Halloween – one could argue that the more decorations you have, the more protection from evil spirits or tricksters – on All Hallows Eve."
Article and Source
Not to mention, when you have a young child, you are constantly trying to avert their eyes from the scary images while driving down the street or going to Walmart or Lowe's (Christian is now afraid of the "tool store where the scary men are").

I would be happy with the following:
This entire post has ideas for fall decorating that are right up my alley.
(and where can I get GREEN pumpkins??!)
Maybe I've said too much.  I definitely don't mean to offend anyone, and many seasonal decorating ideas are very pretty, just not my thing I guess.  And I suppose some people may enjoy being full-on tacky!  So if you have the time, money, and space,  by all means, decorate away!  And who knows, maybe I'm just in a phase.  (If I change my mind, I'll let you know).  But if you feel like the pressure of changing your decor every month (or more!) is wearing on you, it's okay to let it go... one at a time even, and free up some time and money.  

I don't even know what is happening here!  Source
I'm curious to know some of your thoughts.  :)
Happy Decorating!

10.09.2011

Ruffled Lampshade

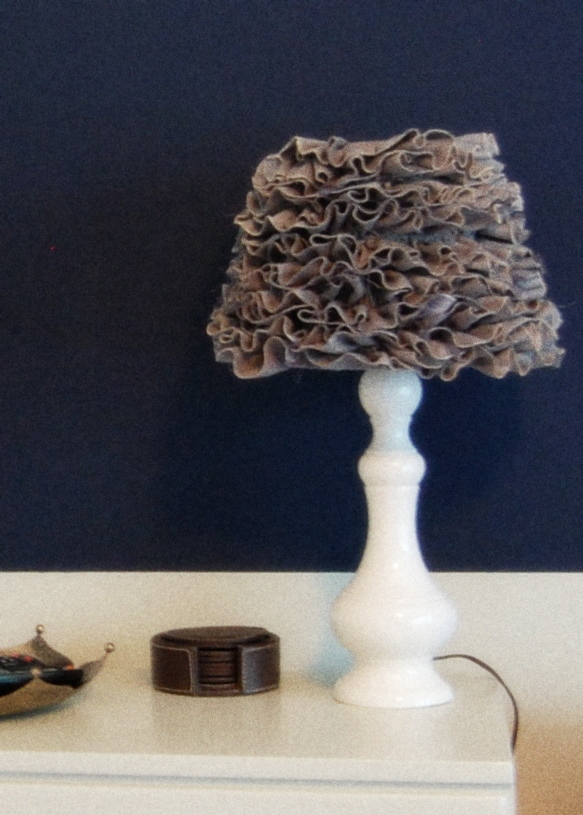
Time to start sharing the details of the family room I showed you a few weeks (months?) ago.  Let's start with the fabric ruffled lampshade that I saw first on Crafty Texas Girl (via Centsational Girl), this is hers:


I had some major lampshade issues in this room.  I was planning on using a little yellow lamp from Goodwill, but no shade seemed to look right.
Yikes.  It's like a bad day in the dressing room.
I ended up choosing the top left shade for the ruffle project because I thought that once I added the ruffle, it would be the right proportions to the lamp.
I started by tracing my lampshade to create a template, then used the template to cut my fabric to cover the white shade.  I really really like the fabric, and wanted to use it even though I figured it wouldn't let much (or any) light through it.

Once I got to the bottom, I didn't like the way you could see the seam of the ruffle, so I glued it to itself to make a cleaner look...
I ended up doing that to the top and bottom to keep the ruffles together.  I put it on my lamp, and still didn't like the way it looked.  I decided it must be the lamp base, so I used a different lamp I had and liked it 100% better.  I don't have a great "after" picture (just like I didn't have "after" pictures of the whole room), but you can get the idea from these pictures...

Ruffle Shmuffle, fun project!  And since the edges of the ruffles are unfinished, I occasionally have to give it haircuts to remove the extra threads, but hey, who doesn't need a little haircut every now and then?  Give this one a try!--- it adds a nice feminine touch to a room without being girly.  I wonder how it would look to use all sorts of different fabric ruffles, varying colors and patterns?  Could be very cool! Again, you can get the full directions here.

Hope you're enjoying this Indian Summer as much as I have been.  Have a great night!

8.26.2011

Family Room Reveal

The kids are napping.  I am wandering around the house wondering what to pack next.  I think I'll write a blog post instead.  Yes, that sounds nice.

I'm finally going to show you what happened in our  family room.  I painted it way back in April, and was trying to get it done all summer.  There was still one more fun idea I wanted to do, but it will have to wait for the next house.  When we moved in the room looked like this...


Yes, a lovely basket of apple border....oh wait, make that TWO layers of different apple borders on top of each other.  But I finally got them off...


And then I started doing something like this...

And then you pour some paint and this happens...
And you thank the Lord OUT LOUD that you remembered to put down plastic drop cloth.  Yikes.

All in all, it turned out something like this...


I now realize I don't even have pictures of the entire room because I never took my "final" pictures.  These snippets will have to do, as the room is now entirely packed away.  You can see more pictures of the tv wall in this post about the family art.

So there isn't anything too special about this room, but a few little things to share with you in the near future, such as the ruffle lampshade, refinished dresser, and how to steam drapes.  I moved that little rocking chair to the other side of the room beside the tv (the kids kept rocking it INTO the dresser....a big "no-no" after I just finished painting it).  We also installed a ceiling fan, because Simon would apparently burn up during the summer without some moving air to keep him cool.  He's so hot (oh yes!).

The best part about this room is when these 3 (apparently I can't count, maybe I think of the girls as one unit?) 4 people are in it with me...

8.11.2011

Nature Wall Art

I haven't forgotten to tell you about a few more details!

While in my parent's garage cutting trim, I noticed a bucket of the leftover trim pieces the contractors had left behind.  I knew instantly they needed to be used, for what other than wall art?... so I went to work!

I took them outside and used things I found in the backyard as my design.
I started by tracing some leaves, sticks, and rocks, onto some paper, then cutting them out.  I taped them onto the blocks and spray painted.
However, I noticed that when I took them off, the spray paint "mist" had gotten underneath the paper, except for where the tape was.  So there were very distinct little squares were the tape had been.  To help remedy it, I tried applying "mist" to the other white parts without completely spraying the board.  It mostly did the trick.
So for another approach, I just laid a branch with nice leaves on the wood and sprayed it.  The one with green/white leaves was done this way, and I LOVE how it turned out.  For the other green one with "globs" on it (those were the rock shapes), I thought it needed more, so I laid some sticks on it and sprayed over the whole thing.

My favorite is, of course, the center one.  I got lucky and found the most lovely piece of driftwood in the stream.  I thought I would have to screw it onto the board from behind, but using 2 nails works sufficiently and that baby ain't goin' no where (excuse my grammar).

To finish them off, I attached picture hangers to the back...

Hang them however makes ya happy, and you're done!  I'm excited to try this in other capacities and use more varied materials.  Get your brain wheels goin'... you can think of anything! Do it do it. :)


7.26.2011

Children's Nook

I hope I made you super curious to see what became of the little hole under the stairs...
(and just to add to your concept of the space, an adult has to bend over to get in.  It's small and cozy.  A nook).

My parents just finished their basement, and I told her to leave this little nook open so we could make a little storage area for her grandkids toys.  It obviously needed a more fun paint color, and she happened to have some left over from her orange laundry room (it was already orange when they moved in, and it's the ONLY room in the house that has color.  I guess the previous owner loved doing her laundry).

Anyway, South Bend has this awesome store called the ReStore--- a place where people take old doors, cabinets, lighting, any and everything that might've been taken out of an older home.  This was the first place I went, just looking for a small bookshelf or other inspiration.  And I found it (inspiration, that is)!
Old stair spindles for $1.50 each.  I knew instantly I wanted to slice them in half and stick them on the wall with trim to top it off.  THEN I found some awesome dentil trim and even though I didn't have enough for the entire space, I got it.  I also bought a bedrest pillow that added some fun color.
TJ Maxx came to the rescue with a perfect rug.
After scouring all the thrift and used furniture stores, I stumbled upon a new antique store (if that's not an oxymoron....).  Behold, I found the PERFECT small bookshelf.  It was already cream, but I added 2 coats of paint to match the trim in my parent's house.
Picked up some spray paint and got to work!
.
.
.
.
.
are you ready to see it?!??!
.
.
.
.
Ta Da!
And when you peek inside...
The actual toy basket sits just outside the nook...
(That basket was a $6 find at a garage sale drive by the day before I left!

And then a few days later, when looking through a Pottery Barn catalog, my mom saw these:

Score!

Now a few details:
Stair Spindles!  I requested the help of my parent's builder and had him use a table saw to slice them in half.  I then got to expand my own abilities: using an air compressor and nail gun to nail 'em in place.  Oh yes.  I like nail guns.
When I bought the spindles, they looked awesomely aged and worn, and the more I looked at them, I knew I wanted to keep them that way.  I think my parents were slightly grimacing at the thought of dirty old spindles hanging on their walls, but too bad, designer's call. hee hee.

Trim: I used my favorite Krylon green spray paint for the dentil trim, and capped it with basic trim used in the rest of the house.

Circle Wall Art: a woven piece given to my parents when we visited Africa to see where my dad grew up.  My grandparents were missionaries in Zimbabwe, and if I have my story straight, the little old woman who made this lived in a village close to where my grandparents served, and she remembered my grandparents fondly.  I doubt that it would have ever been hung anywhere else in the house, but in this space, it's actually fun!
See how I made the Nature Wall Art.  You can totally make this too.  And also see more about lining the Bookshelf with fabric!

I also spray painted the navy blue wicker basket on the bookshelf, and found that great green "tea" tin at Goodwill.
This was one of those projects that just fell into place.  I spent a few hours shopping and just happened to find things that were what I had in mind.  I loved it.  It was also fun to create without the normal limits and distractions.  I think getting out of my house and routine was helpful.

I only finished it the day before we left, so the kids didn't get too much time to use it.  But from the short time using it, they seemed to love it.

Thanks, Mom, for letting my ideas go wild!  If you miss the kids too badly, you can go sit in here and think of them.  But for now, it's all put away and tidy!...
What do you think?
Related Posts Plugin for WordPress, Blogger...